How to Attach Composite Decking to Metal Framework: The Ultimate DIY Guide
When I first decided to build a deck with composite decking on a metal framework, I was excited but also a little intimidated. Metal framing? Composite boards? It sounded like a complicated project reserved for seasoned pros. But let me tell you, after diving into it, I realized it’s totally doable. With the right tools, some patience, and a plan, you can attach composite decking to metal and build a deck that’s not only beautiful but incredibly durable.
In this blog post, I’ll walk you through the process of attaching composite decking to metal framework. We’ll cover the tools you’ll need, some best practices, and a few tips I’ve learned from my own experience. So grab your toolkit and let’s get started!
Why Use Composite Decking and Metal Framing?
Before we jump into the nitty-gritty, let’s talk about why you’d even want to use composite decking with a metal framework.
Benefits of Composite Decking
- Low Maintenance: Unlike wood, composite decking doesn’t need staining, sealing, or constant upkeep. It’s designed to resist fading, staining, and mold, making it perfect for outdoor spaces.
- Durability: Composite materials are made to last. They won’t splinter, warp, or rot like wood can, especially in high-moisture environments.
- Eco-Friendly: Many composite decking options are made from recycled materials, so you’re doing a little good for the planet while enhancing your outdoor space.
Why Pair it with Metal Framing?
- Strength: Metal framing, usually made of galvanized steel or aluminum, offers serious structural integrity. Unlike wood, metal won’t rot, warp, or deteriorate over time.
- Longevity: Metal framing is built to last decades, giving your deck a longer lifespan. Plus, it’s fire-resistant—an added bonus if you’re in an area prone to wildfires.
- Clean Lines: For those who love modern aesthetics, metal framing paired with composite decking creates sleek, crisp lines that elevate the entire look of the deck.
Tools and Materials You’ll Need
Now that you know why this combo is a winning one, let’s get into the tools and materials. Trust me, having the right gear makes all the difference.
| Tools | Materials |
| Drill (preferably cordless) | Composite decking boards |
| Metal-cutting saw | Metal framework (steel or aluminum) |
| Carpenter’s level | Fasteners specifically for composite decking and metal |
| Measuring tape | Spacer clips (for uniform gaps) |
| Safety gear (goggles, gloves) | Composite deck screws |
| Chalk line | Flashing tape (optional but recommended) |
Step-by-Step: How to Attach Composite Decking to Metal Framework
Here’s the main event—the step-by-step process to get your composite decking attached to that sturdy metal framework.
1. Measure Twice, Cut Once
I know this might sound like a cliché, but it holds water—especially with composite decking. Before you start cutting any materials, make sure you measure everything carefully. Take measurements of the frame, board spaces, and screw width. Use a measuring tape and mark everything out with a chalk line to ensure straight cuts and even spacing.
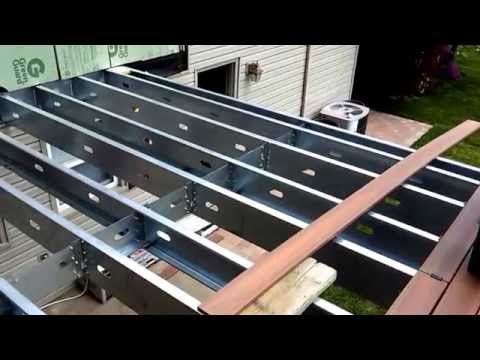
2. Prepping the Metal Framework
Before you lay down the composite decking, double-check that your metal framework is level and secure. A wobbly or uneven frame can lead to bigger problems down the road. Use a carpenter’s level to make sure everything is straight and sturdy.
You may also want to apply flashing tape to the top of the joists. This isn’t a mandatory step, but it can help prevent any water from sitting on the metal and causing rust or other damage over time. It’s a little extra insurance for your deck’s longevity.
3. Cutting Composite Deck Boards
When cutting composite boards, use a saw blade specifically designed for cutting composite materials. It’s a small detail, but using the wrong blade can lead to rough edges or even splintering. Measure your boards, then make clean cuts according to your layout plan.
I find it helps to make all the cuts at once before attaching anything—this way, you can lay everything out like puzzle pieces, ensuring a seamless fit before screwing things down.
4. Attaching the Decking Boards
Now we’re getting to the fun part—attaching those composite boards to your metal framework.
- Start at One Edge: Begin by laying the first board along one edge of the frame. Use spacer clips to ensure you’re leaving consistent gaps between the boards for expansion and water drainage.
- Use the Right Fasteners: Not all screws are created equal. You’ll need composite deck screws or specific fasteners designed for metal. These fasteners have threads that grip both the composite material and the metal frame, ensuring a snug, secure fit.
- Drive the Screws: Drill pilot holes first, then drive the screws in at an angle that helps keep the boards tight against the frame. Make sure you’re not overtightening; you don’t want to crack the composite material.
| Tips for Fastening Composite to Metal | Why It Matters |
| Use a high-torque drill with composite screws | It makes attaching the boards easier and faster. |
| Leave expansion gaps between boards | Composite can expand and contract with weather. |
| Apply gentle pressure when drilling | Overdriving can damage both the board and the metal. |
5. Maintaining Consistent Spacing
One of the trickiest parts of decking, in my opinion, is getting the spacing just right. If you go too tight, you risk the boards buckling when they expand. Too wide, and it looks off. This is where those spacer clips come in handy—they ensure consistent, uniform gaps between boards, which helps with drainage and gives your deck a polished, professional look.
6. Finish with Trim and Edging
Once you’ve attached all the boards, it’s time to finish with some trim or fascia. Trim pieces hide the edges of the composite decking, giving your deck a clean, finished look. Just like with the boards, use screws designed for composite material to attach these pieces to the metal frame.
Best Practices for Success
Over the years, I’ve picked up a few tips and tricks to make the process smoother and the end result more durable.
- Mind the Weather: Composite materials can expand and contract depending on the weather. When attaching the boards, I always leave a little extra space at the ends to accommodate this.
- Don’t Over-Tighten: I’ve learned the hard way that overdriving screws can cause cracks or unnecessary stress on the composite. Firm but gentle pressure is key when driving in the fasteners.
- Check Your Work: After attaching a few boards, I take a step back to ensure everything is level and aligned. It’s easier to make adjustments as you go than to fix a problem after all the boards are in place.
The Pros and Cons of Composite Decking on Metal
I’d be remiss if I didn’t share a little about the pros and cons I’ve experienced working with composite decking on metal frameworks. Knowing the ups and downs can help you avoid common pitfalls.
| Pros | Cons |
| Resistant to rot, mold, and insects | Can be pricier than wood |
| Minimal maintenance required | Composite can fade slightly over time |
| Strong, long-lasting foundation with metal | Requires proper tools for metal framework |
| Great for modern, clean designs | Initial installation can be tricky |
Conclusion: A Deck Built to Last
Attaching composite decking to a metal framework might seem daunting at first, but with the right approach, it’s not only doable—it’s a fantastic choice for a long-lasting, low-maintenance outdoor space. From planning to cutting to fastening, the process rewards patience and attention to detail.
Whether you’re a seasoned DIYer or new to the world of decking, taking the time to do it right pays off. Your reward? A stunning, modern deck that can handle the elements and look beautiful doing it. So roll up your sleeves, grab your tools, and get to work! Trust me, once you’ve finished, you’ll love stepping back and admiring the result of your hard work.